Building my DSLR Camera Trap
 |
| The very elusive Genet, with a Wood Mouse! |
I have been using 'Trail Cams' for a few years now and they are great for finding out what is living in our surrounding area, but image quality is pretty awful, no matter how much you spend. So, up until now, once I have located a creature with the 'trail cam', I have then set up my hide to try and record them with my DSLR.
This has been very successful, but does have one major drawback......I need to be out at all hours, in order to photograph my target. Whilst that is ok during daytime, a lot of wildlife is nocturnal and even if I am prepared to wait in my hide all night, many of these creatures have an amazing range of enhanced senses, which will quickly inform them of my presence!
What I needed, was a 'Trail Cam', capable of taking 'high definition' images of these creatures, so I have just built myself a DSLR Camera Trap. This results in my targets being photographed with a 'proper' camera set up, but without the camera man!
These systems can often be left out in very remote and extreme locations for weeks at a time, and to be reliable, they require protection from pretty much anything that mother nature, can throw at them. Wind, rain, high & low temperatures and even being trampled on!
My main camera gear, is far too valuable to leave unattended, but some of the older cameras available on the market, are perfectly suitable for this use. In fact, I picked up a second hand Nikon D7000 body, for just £100. When used with a standard 'kit' lens (in my case a Nikon 18-55 zoom), it is a cheap and perfect combination. Of course, the whole point of a camera trap, is to get closer to your subject, so expensive, long lenses are not required.
The next thing we need, is a triggering system, which will remotely trigger the camera shutter, which in turn will fire the flash units (when required). For this purpose, I use the 'Camtraptions V3' PIR Trigger System (available for around £195). These systems have been used to capture some of the worlds most famous wildlife shots.
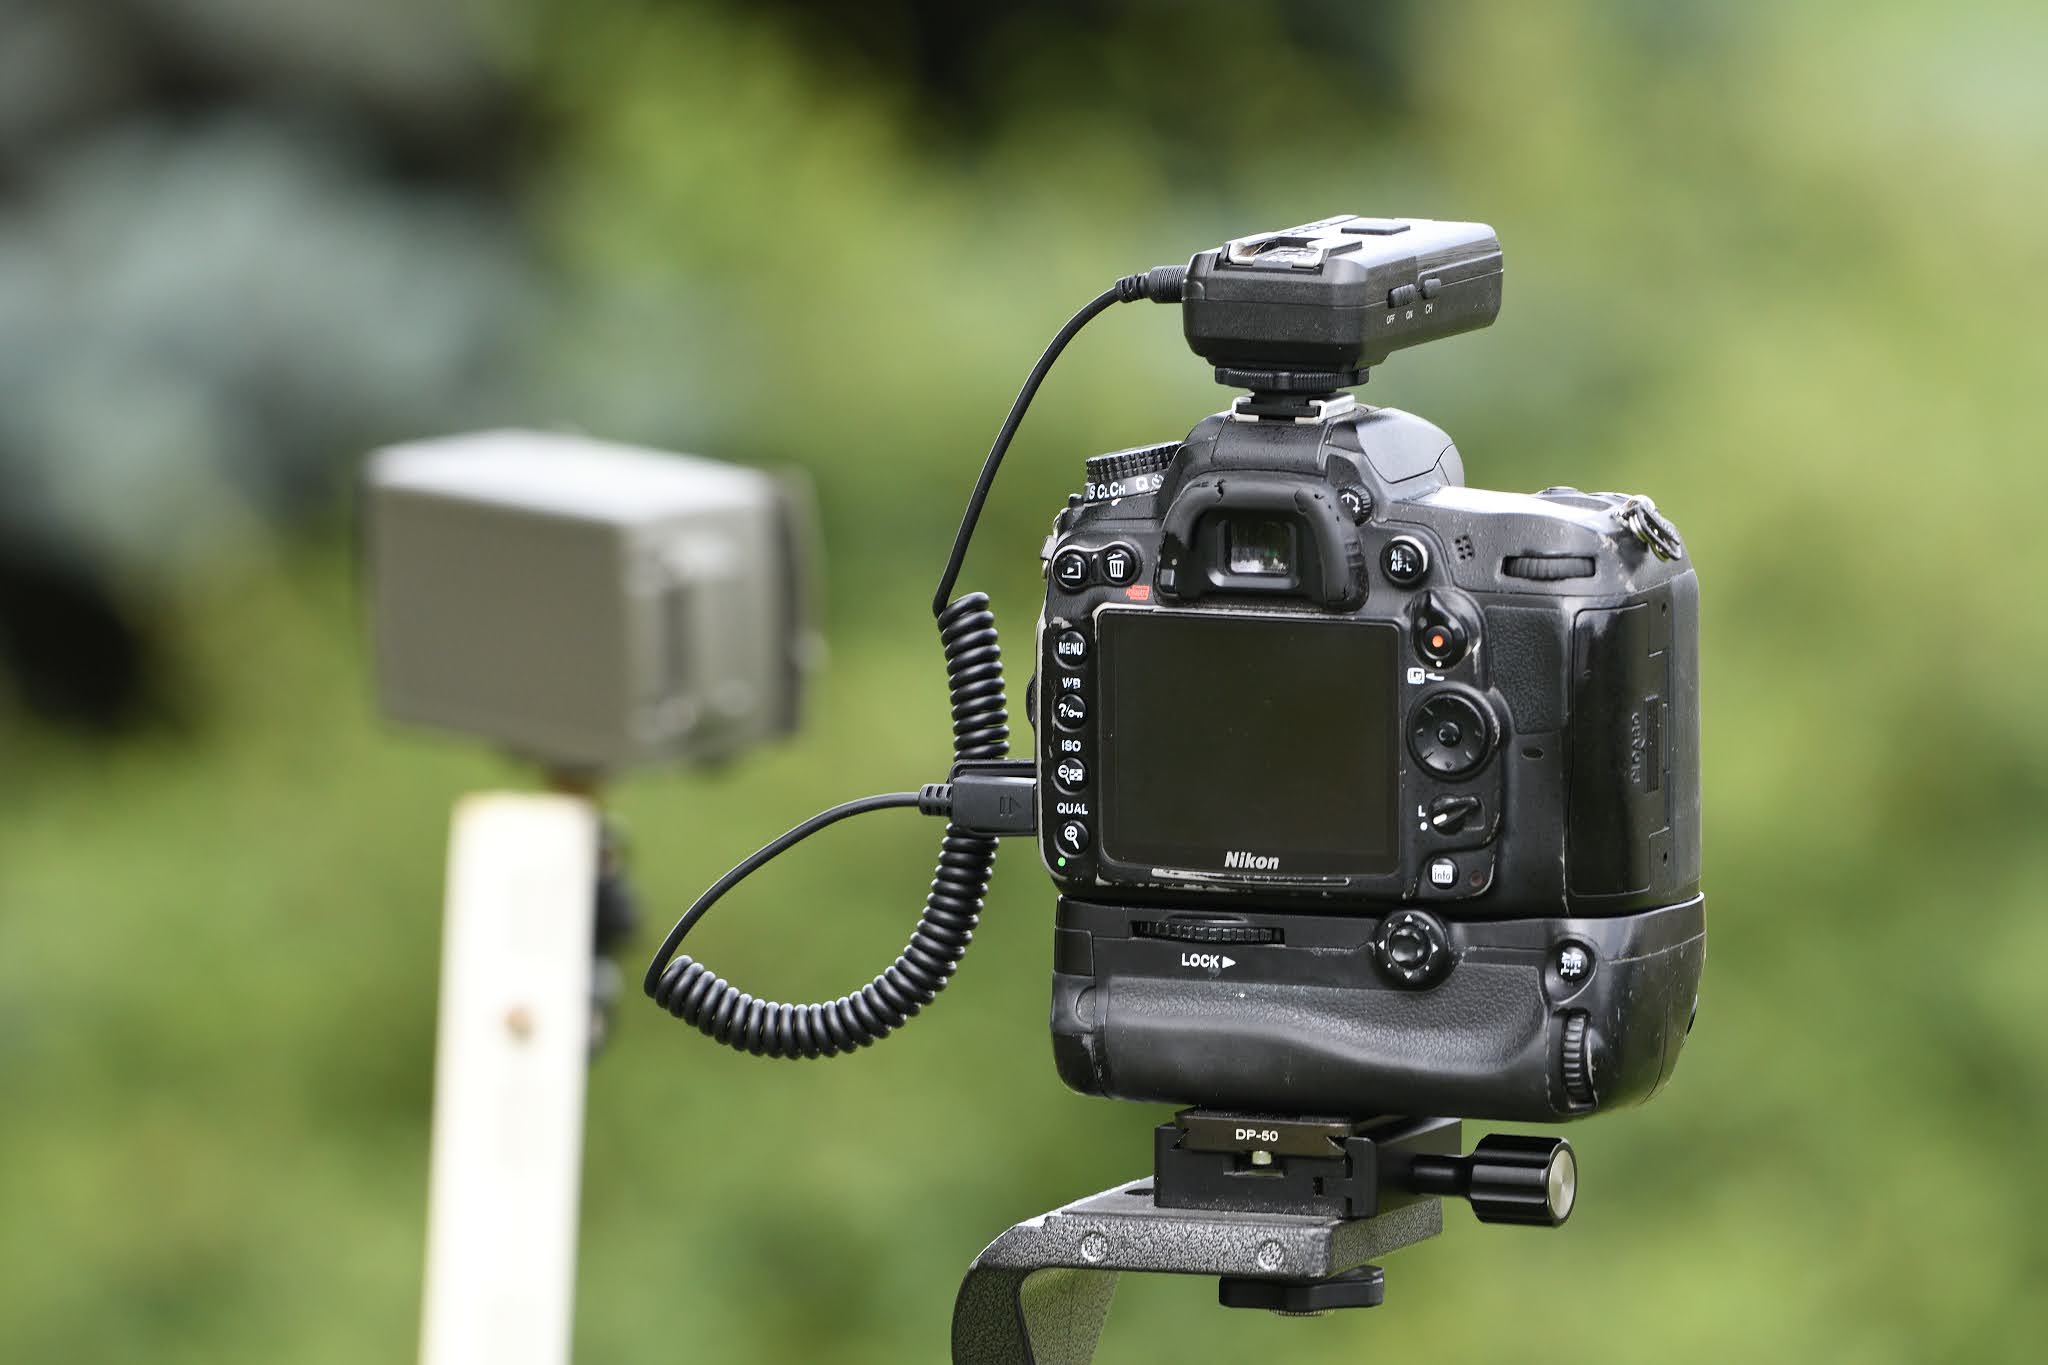 |
| Here is my 'very' second hand Nikon D7000 (complete with battery grip for just £100). The 'Camtraptions' V3 Trigger can be seen to the left of the image, whilst the 'receiver' is mounted to the top of the camera (it does not have to be attached to the camera hot-shoe, but does need to be connected to the camera shutter port). |
During daylight, this sytem can be used exactly as you see it above (subject to good weather) and I have even used it with my 200-500mm lens, to capture the following image recently. This was captured at 06.30 am, whilst I was at home and asleep!
 |
| This shot was taken with the PIR Trigger around 4 meters from the tree, whilst the camera and receiver, were hidden on a tripod, around 20 mtrs from the subject. |
For nocturnal shots, you will require a couple of flash units and an additional 'trigger' for each. I use second hand Nikon SB28's, which are readily available on 'ebay' for around £75 each.
Now that we have all the main items, we need to find a way of housing them all, so that they can be left on location, in all weathers. Ready made housings for the camera and triggers, can be bought from a number of sources and range from £200-800. However, nobody makes housings for flash units, so its either a case of wrapping them in a plastic bag, or designing your own. With some basic DIY skills and some cheap materials, I built housings for my camera and flashes for a total of less than £80.
Here is what I bought to make them:
 |
95mm UV Filter, to act as a window, in the front of the camera housing. This keeps the front of the box waterproof, to protect the camers and lens inside. |
 |
120mm to 100mm Pipe Reducer, to act as rain protector for lens filter, which was glued to front of case |
 |
100mm inspection caps, which were used to blank off both ends of the flash housings (made from 100mm water pipe, which I had laying around) - One 'inner' end of each housing was cut out and replaced with clear plastic, for the flash to fire through and retain waterproofing. |
 |
| These cases have to be tough and many peope use 'Peli Cases' (around £100), however, I found this new unit, which was similar quality for just £25 on Amazon. It comes complete with the foam protectors, which can easily be cut to ensure a snug fit for the camera etc. |
Rather than show a step by step guide of how it was all put together (it was very simple and took a couple of days mainly for the glue/sealer and green paint to dry), here are a couple of images, to show the completed units, ready for action. They can be used as shown, or seperated and placed at varying distances, as the complete system is controlled wirelessly!
 |
| Camera sits behind large 95mm clear UV filter window, which ensures that camera lens is protected. Internally, a foam ring supports the standard lens. |
 |
| 'Camtraptions' shutter trigger can be seen to the left, whilst flash trigger mounts to hot-shoe. |
Of course, you will also need a variety of 'mountings', ranging from tripods, through tree mounts and flexible brackets. - Here are a couple that I use, and were purchased from Amazon.
 |
| Tree Mounts, are a great idea for mounting flashes, or triggers in wooded areas. |
 |
| These 'SmallRig' arms are great value and can be mounted easily to tripod legs, branches, brackets etc. |
So far, I have only been testing the system, to work out suitable flash power settings and camera set up. Here are a couple of images from those tests, to show what can be quickly achieved.
 |
| These images were taken at 11.55pm (35mm, 1/250th, f9, ISO-400) |
The system is now 'out on location' in some local woods, where I have been testing camera/flash settings, to get correct exposures. This involves pretending to be an animal myself, bribing my dog and neighbours cat with some dog food and finding a local hedgehog, who wanted to get 'in on the act'!
 |
| Here, the camera housing can be seen mounted on a low level tripod (modified axle stand!), whilst the flashes are mounted on nearby trees. |
 |
| The 'Tree Mounts' are brilliant and when used with a mini ball-head, give total flexibility of flash angle. |
 |
| It's important to take some test shots, to ensure correct exposure etc. |


 |
| Not the shots that I am hoping for, but proof that the 'system' is capable of getting some quality nocturnal images! |
I am hoping to get some shots of Foxes and Pine Martens in the coming weeks and I will update this blog with some night time results later in the year.
UPDATE - 17/07/2021
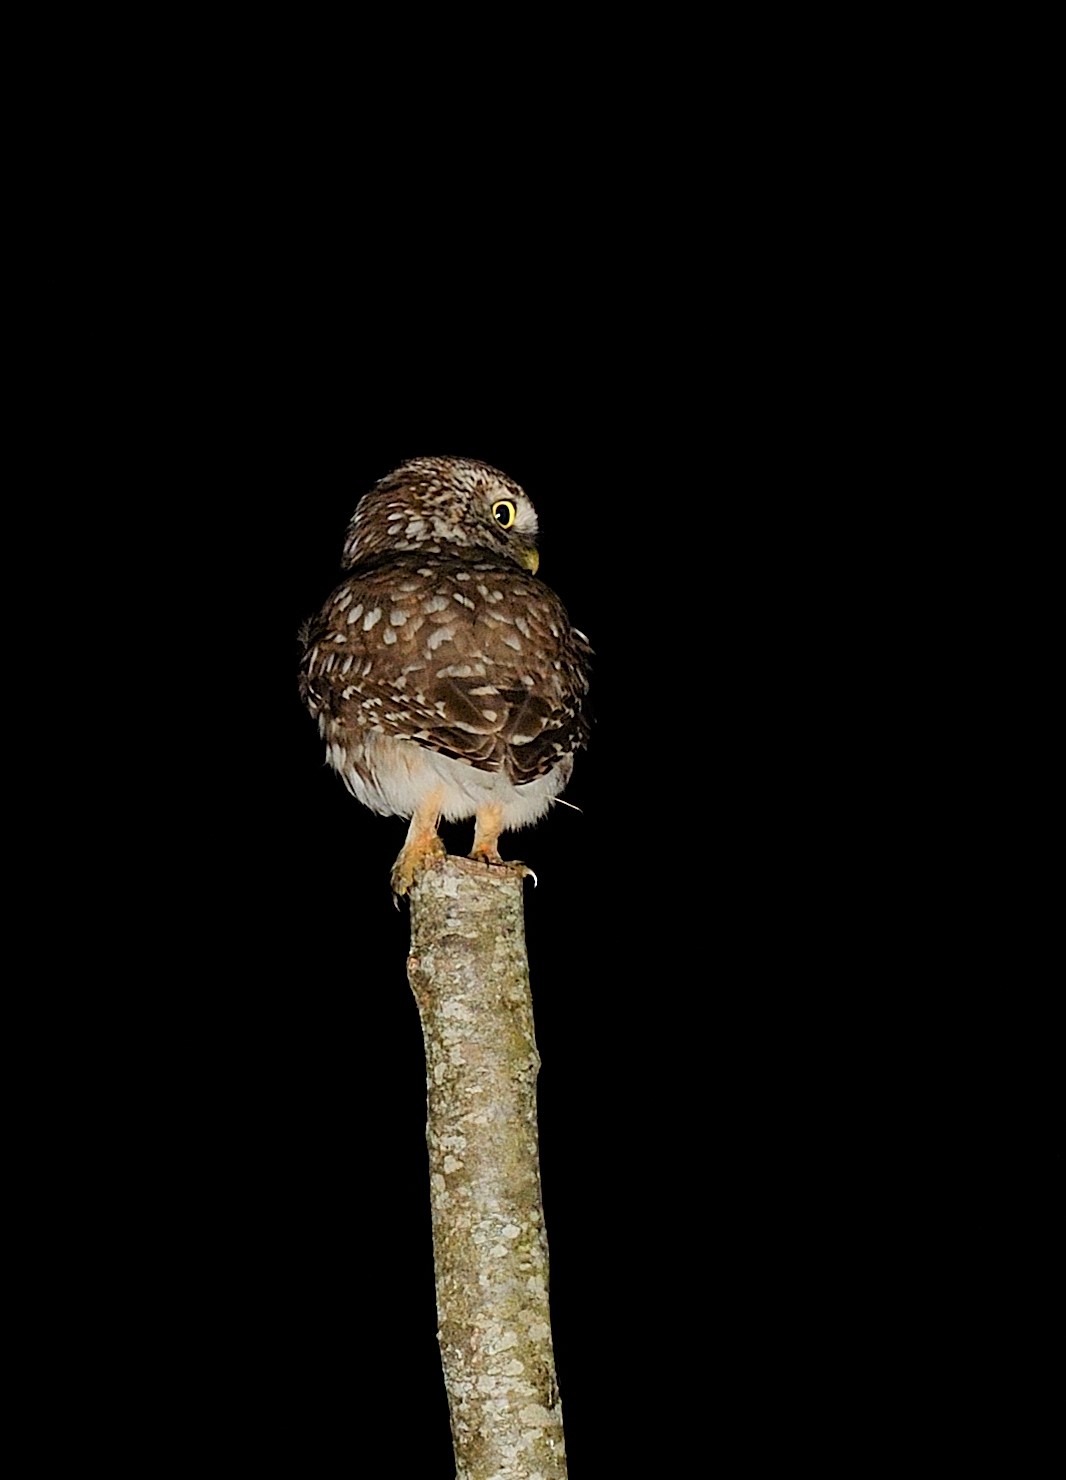
After 4 nights in the forest, I captured my first shot of the elusive Genet - the system works!

Update 19/07/2021
2 nights later, and the Photography gods must have been with me, as the Genet returned, with its dinner (a Wood Mouse). - I can't imagine that I will ever get a better shot!


If you enjoy my blogs, please share them on facebook etc.


Brilliant, brilliant photos and that Genet is so very special. Surely an award winning photo. Now I don't suppose the 'wild animal' behind the logs is one that goes by the name of a Briard is it? 😊
ReplyDeleteVery clever set up and one that is working remarkably well. Well done, I am more than impressed, Diane xx
Hi, I stumbled across this as I was about to set up my camera trap……..again. I donated my old Nikon D300 to my daughter so I’m looking to replace it. However as I search I’m mindful of past the stumbling blocks for me when I had the trap set up before. During the day it is fine but at night I found the camera autofocus was unable to lock on to the subjects which triggered the trap, obviously because of the lack of light. I was using a sb900 speedlight which has a focus assist light but my homemade housing obscures this and I thought it would startle the subject.
ReplyDeleteIt seems you have been able to acquire perfect focus in your shot and I’m intrigued as to how you have done this. Any pointers would be greatly appreciated. As I am in the process of selecting a replacement camera I’m open to all suggestions. I’m also using the camtraptions set up.
Thanks in advance
Nick